Domain Licenses
A domain license enables users with verified email addresses on a certain domain to automatically receive an XSplit license.
Your XSplit Account should be confirmed as a Team License Manager first before you can add domain licenses to your account.
Adding a Domain
Allocating Purchased Licenses to your Domain
Managing Domain Licenses
Verifying your Domain for Single Sign-on (SSO) Integration
SSO Verification Methods
To add a domain, go to the XSplit website's Authentication Dashboard, then click Add domain at the top-right corner of the page.

The Add a Domain License popup should appear. type your preferred domain address in the text field.
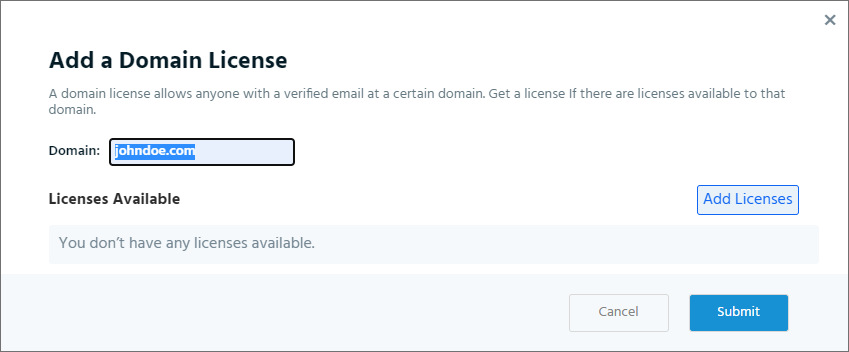
If you haven't purchased any licenses from the License Manager yet, then it will tell you that you don't have any licenses available. In this case, you will need to purchase licenses for your domain. Click Add Licenses to get started.

Here you can customize the subscription type/product/quantity of XSplit Licenses you wish to purchase for your domain.
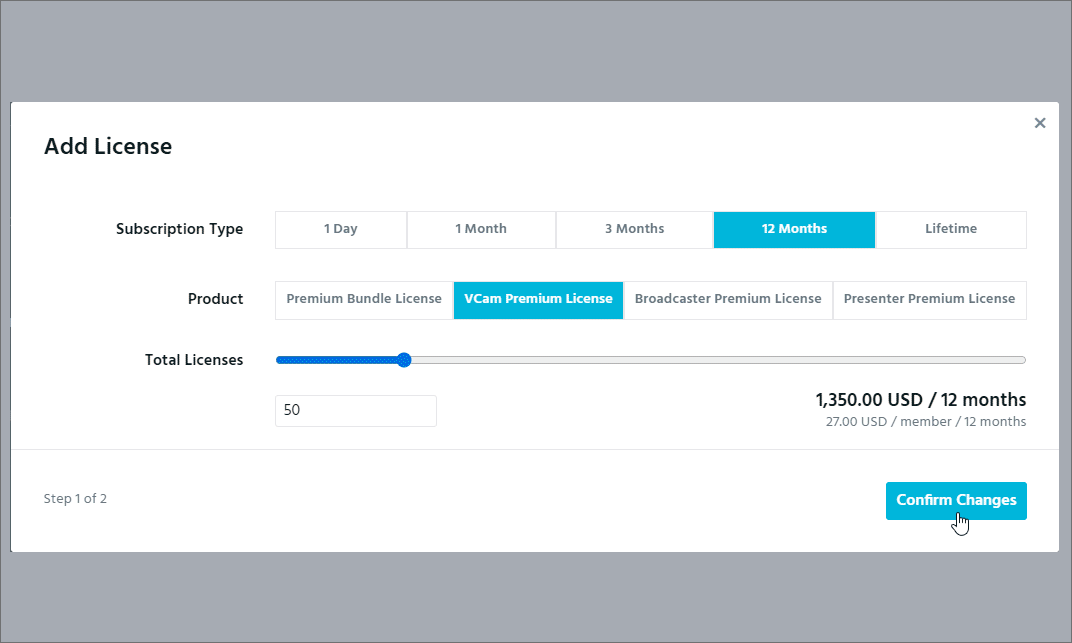
Subscription Type
Allows you to select the duration of the license. (Choose from 1 Day, 1 Month, 3 Months, 12 Months, and Lifetime)
Product
Here you can select the type of XSplit Team License you'd like to purchase. (choose from Premium Bundle License, VCam Premium License, Broadcaster Premium License, and Presenter Premium License)
Total Licenses
Determines the number of Team Licenses you'd like to purchase. You can drag the slider left/right, or type the number directly.
You will see a summary of the License you intend to purchase. Once you have confirmed the license information to be correct, enter your address and credit card details, then click the Pay button at the lower-right corner to complete the payment process.
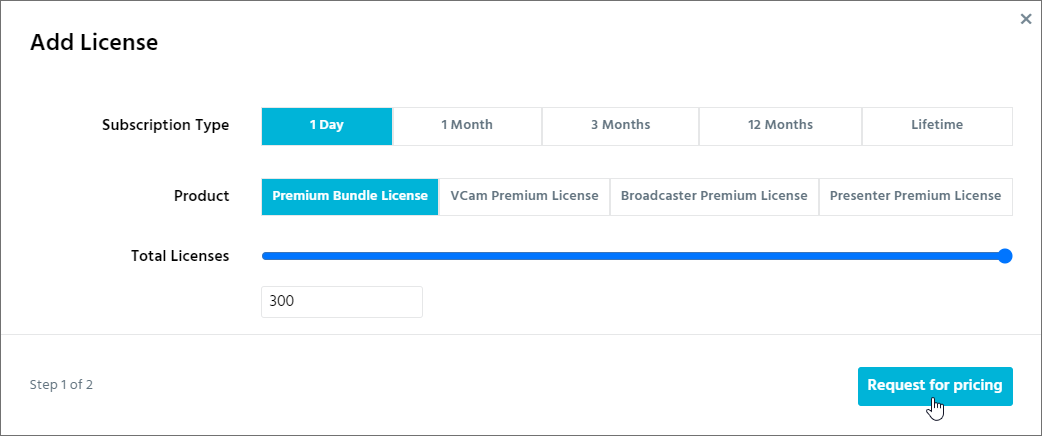
For 300 license or more, the Confirm Changes button will be replaced with Request for Pricing. Click the Request for Pricing button and our Sales Team will assist you through chat.
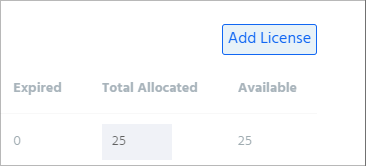
You should see your purchased licenses in the Add a Domain License window. You can adjust the number of licenses you wish to allocate for your domain. Any licenses not allocated to your domain will be available for use when you want to manually Assign Licenses to specific email address through the Licenses Manager, or you can add this later through the Manage Domain Licenses button.
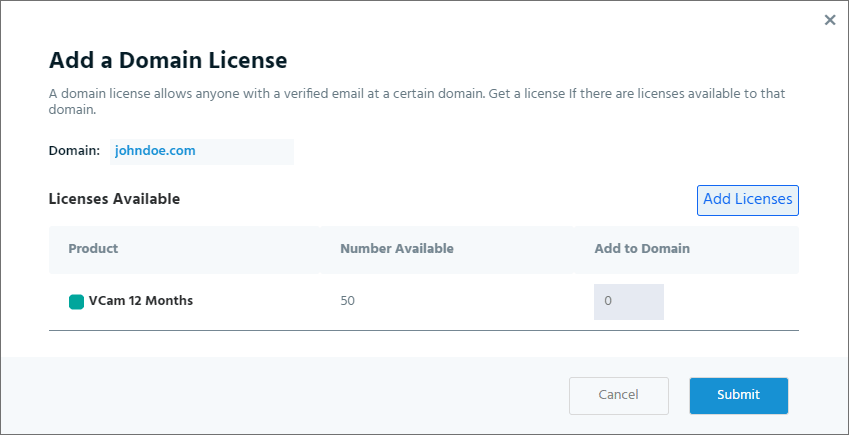
Click Submit when done.
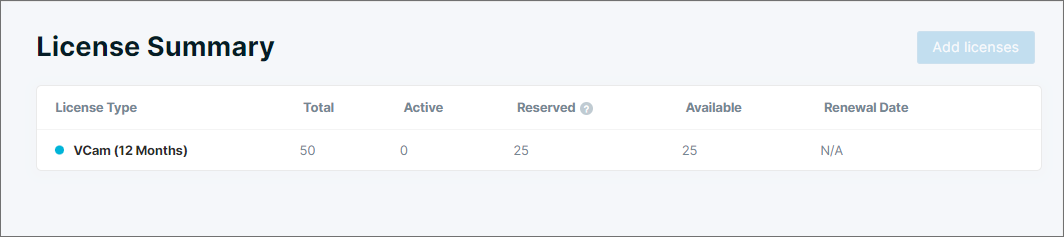
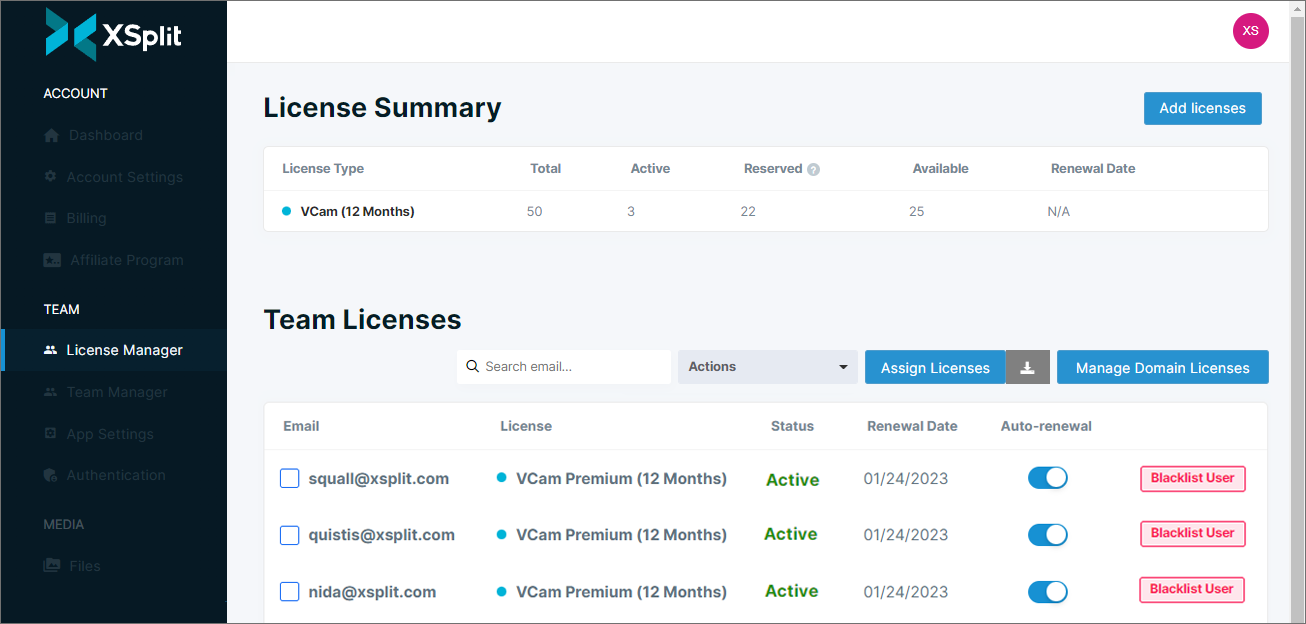
Once done, go to the License Manager dashboard and check the License Summary. The number of licenses you've allocated to your domain should be in Reserved.
The domain license is now available for use. Users need to log in and activate their account to the XSplit website using the email address under your domain to automatically receive the license.
Licenses are automatically applied on a first-come-first-served basis.
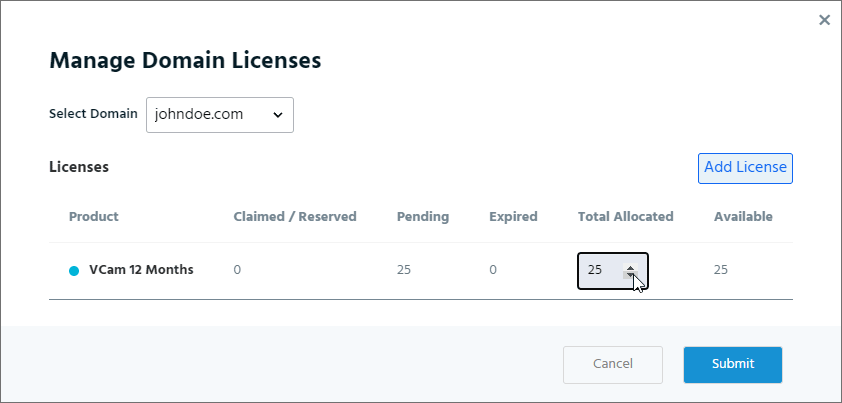
You can adjust the number of licenses you wish to allocate to your domain by clicking the Manage Domain Licenses button in Team Licenses.
This button will only be visible in the License Manager dashboard if you have existing Domain Licenses.

The Add License button is also available if you wish to purchase more licenses for your domain.
Click Submit when done with the changes.
System administrators can also set up Single sign-on (SSO) integration to simplify the sign-in process into XSplit applications for their domain license users.
Go to the XSplit website's Authentication Dashboard, select the domain you wish to verify, and choose the following SSO verification methods that's suitable for you:
By DNS Update
Head over to your DNS Provider and add a TXT record.

By File Upload
You will be required to upload a file to your domain's web server.

Once your domain has been verified, you will be able to configure SSO.
Click here to learn more about configuring Single Sign-On (SSO) for Organizations
Your XSplit Account should be confirmed as a Team License Manager first before you can add domain licenses to your account.
Adding a Domain
Allocating Purchased Licenses to your Domain
Managing Domain Licenses
Verifying your Domain for Single Sign-on (SSO) Integration
SSO Verification Methods
Adding a Domain
To add a domain, go to the XSplit website's Authentication Dashboard, then click Add domain at the top-right corner of the page.
The Add a Domain License popup should appear. type your preferred domain address in the text field.
If you haven't purchased any licenses from the License Manager yet, then it will tell you that you don't have any licenses available. In this case, you will need to purchase licenses for your domain. Click Add Licenses to get started.
Here you can customize the subscription type/product/quantity of XSplit Licenses you wish to purchase for your domain.
Subscription Type
Allows you to select the duration of the license. (Choose from 1 Day, 1 Month, 3 Months, 12 Months, and Lifetime)
Product
Here you can select the type of XSplit Team License you'd like to purchase. (choose from Premium Bundle License, VCam Premium License, Broadcaster Premium License, and Presenter Premium License)
Total Licenses
Determines the number of Team Licenses you'd like to purchase. You can drag the slider left/right, or type the number directly.
You will see a summary of the License you intend to purchase. Once you have confirmed the license information to be correct, enter your address and credit card details, then click the Pay button at the lower-right corner to complete the payment process.
For 300 license or more, the Confirm Changes button will be replaced with Request for Pricing. Click the Request for Pricing button and our Sales Team will assist you through chat.
Allocating Purchased Licenses to your Domain
You should see your purchased licenses in the Add a Domain License window. You can adjust the number of licenses you wish to allocate for your domain. Any licenses not allocated to your domain will be available for use when you want to manually Assign Licenses to specific email address through the Licenses Manager, or you can add this later through the Manage Domain Licenses button.
Click Submit when done.
Once done, go to the License Manager dashboard and check the License Summary. The number of licenses you've allocated to your domain should be in Reserved.
The domain license is now available for use. Users need to log in and activate their account to the XSplit website using the email address under your domain to automatically receive the license.
Licenses are automatically applied on a first-come-first-served basis.
Managing Domain Licenses
You can adjust the number of licenses you wish to allocate to your domain by clicking the Manage Domain Licenses button in Team Licenses.
This button will only be visible in the License Manager dashboard if you have existing Domain Licenses.
The Add License button is also available if you wish to purchase more licenses for your domain.
Click Submit when done with the changes.
Verifying your Domain for Single Sign-on Integration
System administrators can also set up Single sign-on (SSO) integration to simplify the sign-in process into XSplit applications for their domain license users.
Go to the XSplit website's Authentication Dashboard, select the domain you wish to verify, and choose the following SSO verification methods that's suitable for you:
SSO Verification Methods
By DNS Update
Head over to your DNS Provider and add a TXT record.
By File Upload
You will be required to upload a file to your domain's web server.
Once your domain has been verified, you will be able to configure SSO.
Click here to learn more about configuring Single Sign-On (SSO) for Organizations
Updated on: 12/08/2022
Thank you!